Self-Hosting a Forgejo Runner for Codeberg Actions
Table of contents
Why I Run My Own Codeberg Runner
My Codeberg review is still in the pipeline but I wanted to get this out now.
For everyone who doesn’t know Codeberg: it’s a GitHub alternative run by the non-profit organization Codeberg e. V. out of Berlin. It’s based on the Gitea fork Forgejo. Just like GitHub, Forgejo has an Actions feature. Codeberg offers runners to use, but since they’re a non-profit and their resources are limited, the only right thing to do is to set up your own Forgejo runner and connect it to Codeberg.
In this quick guide I’ll show you how to set up the Forgejo runner with Docker and connect it to Codeberg. I set it up on my VPS, which acts as my development server. But since the runner connects to Codeberg and not the other way around, it’s absolutely possible to deploy the runner on a local machine and only fire it up when you need it.
Setting Up the Docker Compose File
The official Forgejo documentation lets you run the runners on bare metal or in Docker. But either way you need Docker or Podman, since the runners run in containers. Since I’m team Docker, I chose to run it in Docker. For security reasons the runners shouldn’t get access to the host Docker daemon and instead be given “Docker in Docker”.
The Docker Compose file is pretty straightforward. Two containers. The DinD and the Forgejo runner itself:
version: '3.8'

services:
  docker-in-docker:
    image: docker:dind
    container_name: 'docker_dind'
    privileged: 'true'
    command: ['dockerd', '-H', 'tcp://0.0.0.0:2375', '--tls=false']
    restart: 'unless-stopped'

  runner:
    image: 'data.forgejo.org/forgejo/runner:12'
    links:
      - docker-in-docker
    depends_on:
      docker-in-docker:
        condition: service_started
    container_name: 'runner'
    environment:
      DOCKER_HOST: tcp://docker-in-docker:2375
    # User without root privileges, but with access to `./data`.
    user: 1001:1001
    volumes:
      - ./data:/data
    restart: 'unless-stopped'
    command: 'forgejo-runner daemon --config runner-config.yml'
We are not quiet ready to start it. You first need to create the data folder and its permissions, and of course the config file. Choose a directory where you want to place the docker-compose.yml. I like to put my Compose files in the /opt directory, but your home folder is also fine. Then create the data and cache folders and give them non-root permissions:
cd /opt/forgejo-runner
mkdir -p data/.cache
chown -R 1001:1001 data
chmod 775 data/.cache
chmod g+s data/.cache
Now it’s time to create the default Forgejo runner config. Using Docker, this can be done with this command:
sudo sh -c 'docker run --rm data.forgejo.org/forgejo/runner:12 forgejo-runner generate-config > data/runner-config.yml'Now we’re almost ready to fire up the runner.
Getting Your Runner Token from Codeberg
Now we need to get our token for the runner from Codeberg. You can set up a runner either for your account, for your organization, or just a single repository. Go to the respective settings -> Actions -> Runners. The Codeberg documentation is outdated here. It tells you to copy the registration token. But that route is deprecated. Instead, hit “Create new runner”, enter the name for your runner and an optional description.

You’re then presented with the UUID and Token. These values need to be added to the runner config so the runner can connect to Codeberg. They’re only shown once, so write them down or you’ll have to reset them later.
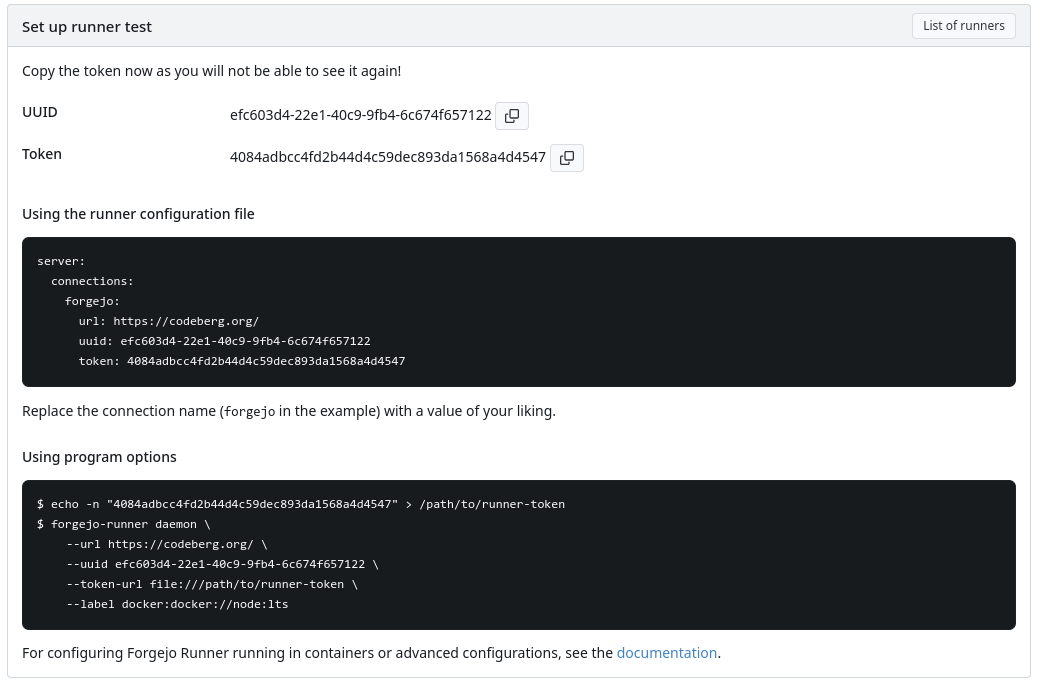
Here, Codeberg hands you the correct config so you don’t have to bother writing it yourself. Which, given my own YAML track record, I’m grateful for.
Editing the Config and Starting the Runner
Head back to the folder where you created the runner-config.yml and open it with the text editor of your choice. The default config is fine for most users. It’s very well documented. Just scroll through it and you’ll understand it. The only optional change I made is the capacity setting. Default is one job per runner. I set it to 4. And then there are two changes you have to make: add the server config and set the runner labels.
In line 63 you’ll find the config for the labels:
 # The labels of a runner are used to determine which jobs the runner can run and how to run them.
 # Like: ["macos-arm64:host", "ubuntu-latest:docker://node:20-bookworm", "ubuntu-22.04:docker://node:20-bookworm"]
 # If it's empty when registering, it will ask for inputting labels.
 # If it's empty when executing the `daemon`, it will use labels in the `.runner` file.
 labels: ['ubuntu-latest:docker://node:20-bookworm', 'ubuntu-22.04:docker://node:20-bookworm', 'ubuntu-24.04:docker://node:22-bookworm']
These labels tell Codeberg what actions the runner can handle. Think of it as a matchmaking system between your workflows and this runner. Each label follows a strict three-part syntax: [Workflow Label]:[Execution Method]://[Environment].
- The Workflow Label (
ubuntu-latest): This is the trigger. If a workflow file saysruns-on: ubuntu-latest, this runner will raise its hand and take the job. - The Execution Method (
docker): This tells the runner to spin up an isolated Docker container to execute the workflow steps. - The Environment (
//node:20-bookworm): This is the actual Docker image the runner pulls to run the job. (Notice it uses a Node/Debian image to essentially “fake” an Ubuntu environment, which works perfectly fine for most standard workflows.)
I didn’t have any special requirements and just set ubuntu. Feel free to copy my config.
Now you’ll need the config from Codeberg you wrote down earlier. This goes at the bottom of the config file. There’s already a placeholder:
server:
  # A map of connections to one or more Forgejo instances. Example:
  # [...]
  # minimum value for certain instances like Codeberg.
  connections:
Codeberg gives you the entire server block. So make sure not to just paste it at the bottom. Below connections:, put the forgejo block from Codeberg. Replace forgejo with a name of you liking. The final result should look like this:
server:
  # A map of connections to one or more Forgejo instances. Example:
  # [...]
  # minimum value for certain instances like Codeberg.
  connections:
    my-codeberg-runner:
      url: https://codeberg.org/
      uuid: <UUID>
      token: <TOKEN>
All set. Now fire it up with sudo docker compose up -d. If everything is set up correctly, the runner overview in Codeberg should now show “Idle” next to your runner.
Using Your New Runner
To use your new runner, you either specify it directly by its name in your action or tell it to use the label you assigned to it. In my case that would be “ubuntu-latest”:
# .forgejo/workflows/test.yml
on: [push]

jobs:
  hello:
    runs-on: ubuntu-latest # or the name of your runner you set in Codeberg
    steps:
      - run: echo "Running on my own runner!"
TL;DR
Codeberg’s shared runners are limited because they’re a non-profit, so host your own. Run two containers with Docker Compose: docker:dind and data.forgejo.org/forgejo/runner:12. Create the data folder with 1001:1001 permissions, generate the config, then grab a UUID and token from Codeberg under Settings -> Actions -> Runners via “Create new runner”. Paste the forgejo block under connections:, set your labels, and run docker compose up -d.
Written by
Alexander Hammer
Software developer. Arch Linux. Self-hosted everything.
Popular Posts
- #1
- #2
-
#3
Why I Switched from WordPress to Hugo
501 views · Read -
#4
Ricing Hyprland with Claude Code CLI
126 views · Read -
#5
We got lost in AI
121 views · Read